Pytest Tutorial - 5 | The Basics - How to write data-driven tests?
So far we have understood how to write simple tests in pytests. We also saw pytest in action.
In this tutorial we will now learn how to write data driven tests.
What are data driven Tests?
These are those tests, which tests a functionality using various scenarios mocked through a set of test data. In order to achieve this we pass the test data from external data sources such as csv/excel/yaml/json/database/etc.
Now why do we need to pass test data from an external data source?
Very simple reasons:
If the test data is not passed through an external data source, then everytime we add/update/remove test data, we need to update our code.
One test case can be tested using multiple combinations of data to test for various conditions of validation
Example 1: you can test login using 2 types of test data
Valid credentials
Invalid credentials
Example 2: you can also test password change functionality with 6 types of test data:
(Minimum - 1) allowed length of password
(Maximum + 1) allowed length of password
Minimum allowed length of password
Maximum allowed length of password
Valid combination of allowed character types
Invalid combination of not allowed or missing character types
With this learned let's move on to create data driven tests.
Clone the pytest-tutorial-5 repository in your desired location using command:
git clone https://github.com/TheEngrNest/pytest-tutorial-5.git
Open the project in pycharm
Set up a virtual environment and install the packages from requirements.txt.
After opening you will notice that there are 2 packages related to tests.
test_data
tests (see below image)

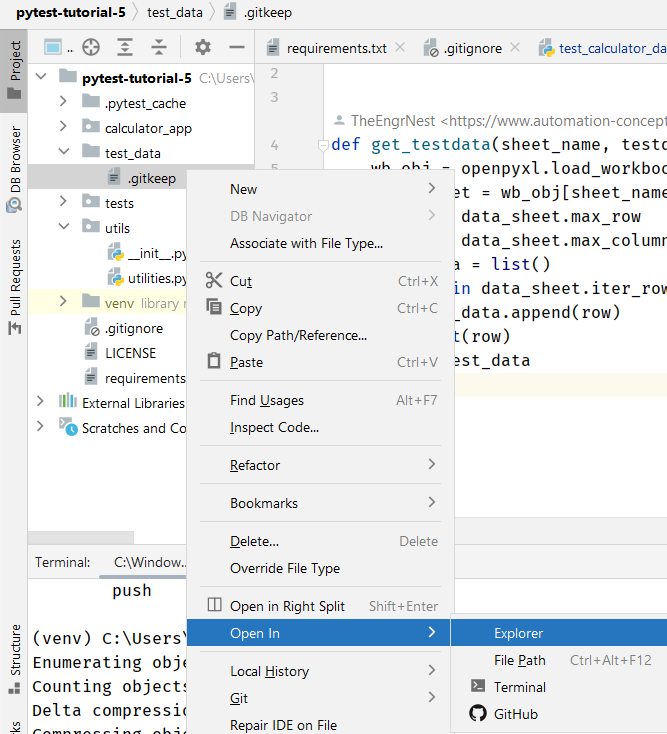
Now, let’s expand the test_data package and open the folder in explorer.
Right click on the test_data package > Select Open In > Explorer.
Also download the test data sheet from this link and place it in the test_data folder opened in the previous step.
The above test data excel file contains 4 sheets for add, subtract, multiply and divide functionality tests. Each of these sheets has 3 columns, the first 2 columns contain the test data and the 3rd column contains the expected result.
Now let’s switch back to our tutorial project in pycharm and expand the tests package.
Here you will notice a test file: test_calculator_datadriven.py.
Open this file, you will see that it has skeleton code for 4 tests.
Now in order to add data driven capabilities to these tests, we will
Read the test data sheet for each test using the get_testdata function present in utils/utilities.py. (this function returns a list of tuple from the test data sheet)
Then we will add a decorator (@pytest.mark.parametrize()) just above each test_*() tests in tests/test_calculator_datadriven.py.
The above decorator takes 2 parameters:
Comma separated variable names of the test function in string format.
List of lists/tuples of test data.
Let’s import the get_testdata function in our tests/test_calculator_datadriven.py.
from utils.utilities import get_testdata
Lets load test data from excel sheet using above imported function for all 4 tests, put below lines at line # 8.
add_test_data = get_testdata('add')
subtract_test_data = get_testdata('subtract')
multiply_test_data = get_testdata('multiply')
Just above each of our test functions lets add the pytest.mark.parametrize decorator.
@pytest.mark.parametrize('a,b,expected_result', add_test_data)
@pytest.mark.parametrize('a, b, expected_result', subtract_test_data)
@pytest.mark.parametrize('a,b, expected_result', multiply_test_data)
After correctly following steps 12 and 13, you script should look like below
# Contents of tests/test_calculator_datadriven.py
# -----------------------------------------------------
import pytestfrom calculator_app.calculator import add, subtract, multiply, divide
from utils.utilities import get_testdata
add_test_data = get_testdata('add')
subtract_test_data = get_testdata('subtract')
multiply_test_data = get_testdata('multiply')
@pytest.mark.parametrize('a,b,expected_result', add_test_data)
def test_add(a, b, expected_result):
actual_result = add(a, b)
assert actual_result == expected_result
@pytest.mark.parametrize('a, b, expected_result', subtract_test_data)
def test_subtract(a, b, expected_result):
actual_result = subtract(a, b)
assert actual_result == expected_result
@pytest.mark.parametrize('a,b,expected_result', multiply_test_data)
def test_multiply(a, b, expected_result):
actual_result = multiply(a, b)
assert actual_result == expected_result
# Unit test function to test the divide function
def test_divide():
pass
Now we will run our tests using following command: pytest --verbose
The output:

If you were able to successfully run the tests, then you will observe that there are 13 tests which passed.
So what basically happened?
TAKING ADD FUNCTIONALITY AS AN EXAMPLE.
So we wanted to test ADD function of calculator (which adds 2 numbers and gives result)
In order to test the function with multiple test data, we created a sheet called “add”. It contains below test data:

After our test data was created, we loaded the test data using get_testdata function from utils/utilities.py. Once data was loaded we added @pytest.mark.parametrize decorator to the individual tests and passed the loaded data to it. Then simply ran the tests using the pytest command in the terminal.
If you have understood this, then you should be able to extrapolate this for other 3 functions.
Exercise:
Now as part of the exercise, try creating the data driven tests for divide function.
Comments
Post a Comment